Synaptic is a graphical user interface (GUI) for managing software packages on Debian-based distributions. If you are using Debian or Ubuntu you will easily find Synaptic in the System Tools menu or in the Administration menu. Synaptic uses the GTK graphic libraries . So, if you are using GNOME on your debian-based distro you will probably have Synaptic installed as well. Synaptic is a graphical package management program for apt. It provides the same features as the apt-get command line utility with a GUI front-end based on Gtk+.
Now we will see how to add repositories,install,remove and update software packages
Adding repositories Using Synaptic
To Open Synaptic Package manager go to System—>Administration—>Synaptic package manager

once it opens you should see the following screen asking for the password for root or equivalent users.To manage package installations you need administration privileges; so you need to either be root or to authenticate as such.

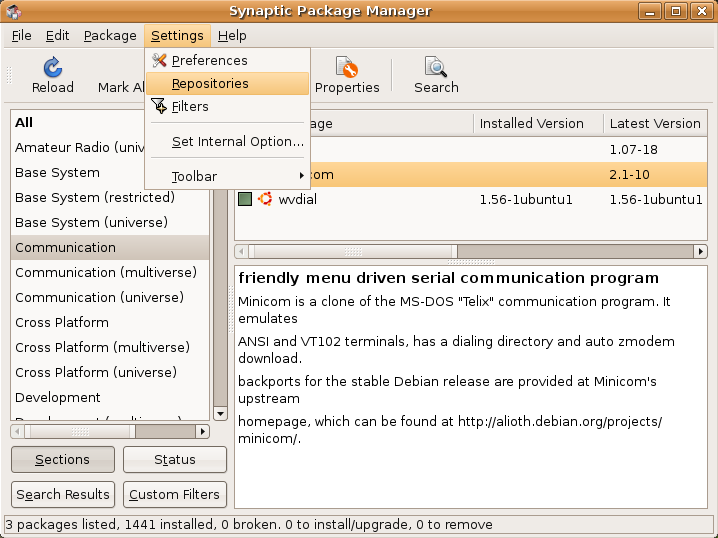
Once it open the Synaptic Package Manager you should see the following screen.The main window is divided into three sections that is a package browser on the left, the package list on the upper right, and package details on the lower right. The status bar shows you the system state at a glance.

Now if you want to add repositories you need to go to settings—>Repositories you can see this in the following screen
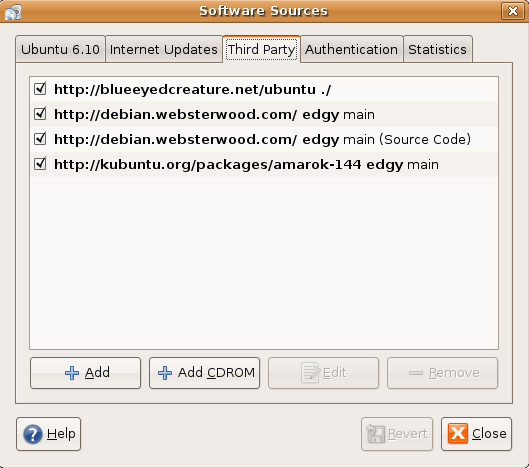
Once it opens the Repositories menu you should see the following screen in this screen you can select repositories,internet updates,Third party,Authentication and statistics.Now we will see one by one first tab is ubuntu 6.10 repositories you need to select which one you want to add like main,universe,multiverse,restricted,source code and the name of the server you want to download from

Now we will see each one what it means if you want more information check here
Main Repositories
The main distribution component contains applications that are free software, can freely be redistributed and are fully supported by the Ubuntu team. This includes the most popular and most reliable open source applications available, much of which is installed by default when you install Ubuntu.
Restricted Repositories
The restricted component is reserved for software that is very commonly used, and which is supported by the Ubuntu team even though it is not available under a completely free licence. Please note that it may not be possible to provide complete support for this software since we are unable to fix the software ourselves, but can only forward problem reports to the actual authors.
Universe Repositories
The universe component is a snapshot of the free, open source, and Linux world. In universe you can find almost every piece of open source software, and software available under a variety of less open licences, all built automatically from a variety of public sources. All of this software is compiled against the libraries and using the tools that form part of main, so it should install and work well with the software in main, but it comes with no guarantee of security fixes and support. The universe component includes thousands of pieces of software. Through universe, users are able to have the diversity and flexibility offered by the vast open source world on top of a stable Ubuntu core.
Multiverse Repositories
The “multiverse” component contains software that is “not free”, which means the licensing requirements of this software do not meet the Ubuntu “main” Component Licence Policy.
Now if you click on Internet Updates tab you should see the following screen here you need to select what updates you want to run,when to update these updates and you want to install these updates

Now if you click on Third party tab you can enter third Party repositories and cdrom repositories here
If you want to add new source click on add you should see the following screen here you need to enter your source and click on add source

Next one is if you click on authentication tab here you can import the authentication keys for the packages you can click on import key file to import

Final Tab is Statistics this is only for popularity contest

After finishing all your settings you need to click on close once you click on close.you should see the following screen with the information saying you need to click on reload button to take effects of your new settings

Now you need to click on reload button located at the top panel of Synaptic manager or simply you can press or press Ctrl + R

You can see all the required packages are downloading in progress once it finish the download you are ready with your new Repositories list.

Ubuntu Dapper users
If you are using ubuntu 6.06 (dapper) and other versions when you open settings—>Repositories you can see this in the following screen under installation media tab

If you want to add Repositories you need to click on add you should see the following screen here you can select channel,components and click add

Here you can see the available channels list
If you want to add custom or third party repositories click on custom button you should see the following screen add your repositories click on add channel

Internet updates tab look like below here you can select when do you want to update your repositories

Install a Package Using Synaptic Package Manager
For example you want to install a package called dia-gnome for this you need to select the package and right click on that you should see the following screen here you need to select mark for installation or press Ctrl + I

This will popup a window saying that some of the other packages also required changes click on mark

You can see this package is marked for installation with an arrow mark next to the check box

Now you need to apply these changes by clicking on “Apply” in the toolbar or press Ctrl + P

Now it will show you the packages are going to be installed here you need to click on apply

Downloading all the required packages in progress

Installing the package is in progress

If you want to see the details of the installation package you can see in the following screen

Changes are applied successfully windows and click on close

Remove a Package Using Synaptic Package Manager
Now if you want to remove installed package you need to select that package and right click on that you need to select Mark for removal option

Here you can see the packages are going to be removed and other details here you need to click on apply or press Ctrl + P

Removing package is in progress

Changes are applied successfully windows and click on close

Upgrade a Package Using Synaptic Package Manager
You need to Click Reload or press Ctrl + R to make Synaptic aware of the latest updates.
Now you need to Right-click on the package you want to upgrade and choose Mark for Upgrade from the context menu, or press Ctrl + U.

Once you have finished with your choices, click on Apply in the toolbar or press Ctrl + P.
A dialog box appears with a summary of changes that will be made. Confirm the changes by clicking on Apply.

This will start the download and installation in progress you can see in the following screen

Changes are applied successfully windows and click on close

Search a Package Using Synaptic Package Manager
If you want to search a package you need to click on search option in synaptic tool bar

You should see the following screen asking for package name and select the the option like description or name or both and click on search in this example i am searching for shorewall

You should see the results in the following screen if you want to install these packages you can follow the above procedure

As a front-end to apt,Synaptic uses the system-wide list of software repositories file located at /etc/apt/sources.list file
This tools is very simple to use for new users how to install,remove,upgrade packages
This tutorial is simple tutorial how to use synaptic Package Manager in ubuntu,Debian
In houston mortgage loans are not issued against car finance, and never with a history of bad credit loans. The chicago real estate has similar scruples.
I am a 20 year DOS/Windows professional and have only recently loaded Ubuntu as an alternative OS. Your turorials are excellent and have kept me from going back to Win as my main OS.
Thanks
Dave
Having the screen shots is simple yet brilliant, it made the written instruction even more clear. Well done!
thanks ,, it`s nice
thank you very much!!!!
By giving the images it very easy to use the synatic package manager….thanks a lot….
i recently installed ubuntu as an alternative to win.XP but it did not play mp3.
i was searching for a mediaplayer to run on ubuntu …i did not understand the terminologies used here….-“repositories” bla bla…cant we have a installer pakage like “.exe” instead of all these yada yada..?
Thank you very much.
I am a newbee to Linux, please excuse if the question is silly.
I installed “Astrolog” for a friend on his Ubuntu.
Synaptic Package Manager says Status: Installed
Installed Version 5.40-3
But I cannot find a shortcut to start the program, searched in all “Applications”, System and so on.
Thanks!
Lars
Thanks a bunch from a newbie fleeing Windows
Thank you, Logical, clear a masterpiece of Help.
After 22 years of windows I am a little lost trying to find where everything is. I am now committed to Linux after accidentally destroying my file header tables playing with the Beta iso of Hardy Heron in March! What is overwhelmingly apparent is that Linux devotees have Help files that actually help!!!! so it is a journey of exploration after twenty two years of exploitation. Bless you God is on your side. If you don’t like him you will definitely have the force.
Now, how the hell does Myth TV work and where the blue blazes am I going to find drivers from for my Olispaghetti Artjet 10? I don’t think.
Good luck, live long and perspire Chris……Hardly a Heron.
Thank you
you screen shots and description about them helps a lot to make things working in Ubuntu for Newbie like me.
Thank you
am a newbie to Linux and your suggestions with visuals helped. I just successfully installed the vlc player. can play my dvds and other stuff. on my way to say goodbye to microsoft.
regards.
I thank you for your clear explanation, i did followed your steps and i managed to set up my repository.
thanks
Thanks for the explanation. 🙂
The problem is, I need the VLC DECODER, for some videos I downloaded and it’s not in the synaptic package manager, so I don’t know where to find it, or how to install it!!
thanks.
I think you need to make clear for the sake of those coming from a Windows background, that the Linux way of installing software is through “software packages” rather than “software installers” (which is probably the more popular way of installing software under Windows). The difference should be made clear. You could compare a “package manager” to the Add/Remove Programs menu item in Windows.
hi guys, nice post! i can’t understand y the makers of ubuntu assumed that an average starter in a 3rd world country would have a high speed internet connection to his pc.
I just installed ubuntu 8.04 and I’m a noob…
well when i go to net and search for downloadable device drivers and multimedia players, I go fucked up!
is there any option availble or the only is the only option available to me is going to be a get a connection! answer?
HELP. I’m a noob
I have a dual boot system. I am attempting to set up Mozilla Thunderbird email. Tech. support have instructed me to go to Synaptic Package Manager.
I have accessed System > Administration, but Synaptic is not there. Typing “synaptic ” in the Google box, I cannot find a download.
Any suggestions would be appreciated.
I have Ubuntu 8.04
Thanks
Malibujohn
As i am new to ubuntu i couldn’t install softwares..after taking the visual intructions from this site.. i could easily install all the softwares…..
thanks for this superb work guys,…….
hi guys,
I am new to Linux and your suggestions with visuals helped. But there is a prob how can i connect to the internet … Ubuntu detects my network card but i can only be connected to the internet by giving a user name and password i think its called VPN but there is nothing to make a VPN connection i mean it didnt give me the access to edit info please help ….
Thanks in advance
Junaid Muqri
FOSS-the real freedom
I am studying Computer for 2 years and i started to use Linux only 6 months back . Now i will never switch on To Windows .It really rocks. the above tutorial really explained neatly and beautifully.
still me knowledge can be developed
I am trying to install postgresql on Ubuntu 7.10 as per the steps mentioned in this article but I could not install it successfully. while installing Error shows some files are not found (404 file not found error).
Please let me know how to proceed.
What a simple and easy tutorial, I’m a newbies for ubuntu, but got everything at hand.
Keep it up.
thanks.
sizedin
Hi,
I’m also a newbie to the Linux community. My preferred distro is Ubuntu. I have been in the computer field for over 20 years working VAX minis and Windows networks as a developer of payroll, warehouse and accounting systems.
Not sure if this is the place for this, but here goes.
I have hit a snag with Synaptic. It was under Ubuntu Studio 9.04 but the problem doesn’t appear to be with Studio. I was installing some stuff and the process hung. I killed it and rebooted into the repair menu. It said it had found a recursive procedure, was fixing it and that a reboot was required. The procedure was loading a mail merge Python file for OpenOffice.
I rebooted. Half of my system didn’t work. That is understandable since the installer hadn’t finished and cleaned up. I couldn’t run Synaptic again. I ran the sudo command it gave me and – well, when it got to the same line it hung again. Obviously the recursive problem hadn’t been fixed or flagged.
Bottom line: Is there anything I can do to tell synaptic to ignore this and continue with the rest of the installation, or am I looking at a reinstall?
As it is my system is useless. For what it is worth I was quite pleased with Ubuntu Studio and what had been done with 9.04. Having been a programmer I know that stuff happens. My guess is that I just hit some weird combination of things to install.
Thanks for any help I can get.
Take care all,
Wayne
ecently installed ubuntu as an alternative to win.XP but it did not play mp3.
i was searching for a mediaplayer to run on ubuntu …i did not understand the terminologies used here….-”repositories” bla bla…cant we have a installer pakage like “.exe” instead of all these yada yada..?
Awesome guys. I’,m doing well with Ubuntu 9.04 Jaunty Jackalope. The above instructions are simple and clear for any novice according to me.
Wow, these instructions are great. I’m on Ubuntu hardy.
This must have taken a lot of work. Why can’t other people make “linux”/Ubuntu so easy to use? It’s always commandline this, commandline that, and after all is said and done I never felt any more knowledgeable or competent afterwards.
This really made my day.
my name is majaaz i need help for reinstalling synaptic packet manager when i open synaptic packet manager it is showing these error
E: Type ‘open() failed, please report.
what i have do now please help iam new to ubuntu
I lost my synaptic Package Manager since i was a newbie i didn’t know that if I disable synaptic. The Synaptic Package Manager will be lost how can I restore it??? huhuhuhu Thanks ^_^
I recently installed Ubuntu 9.10 om my now dual-boot Ubuntu/Windows XP PC. I much prefer GUI interface to install software or add-ons. Synaptic is kind of scary and I am only beginning to understand command line interface. I installed VLC with Synaptic but it was sort of hit or miss; I seem to have done it right. Movie Player with add-ons seems to crap out streaming music so I hope VLC works instead.
You Tube video streams in Firefox often freeze up, even though the download speed is good and the sound often continues. I upgraded my GeForce 6200 graphics driver which didn’t hurt but the freeze up still happens… Advice to use command line changes is too much for now. That’s why my PC will stay dual boot for now. My friends say “just buy an iMac” but I am too stubborn. Maybe I want to learn this stuff, even though it will take a long time.
how do i open a package i have installed, eg a game
Hey Guys!
can anyone tell me how to install build-essential package through synaptic package manager..
i m getting a error message “please insert the ubantu cd with the specified version in the cd rom”.but when i insert the disk the error remains the same…
can anyone tell me what kind of error it is..
i m facing the same problem while installing the “dpkg-dev”.
these are the few packages that we need to install if we want to create our own package…
plzz help..thanks in advance..
….
And one more thing can anyone tell me the easiest way to create our own package so that i can install software of my choice..
I am trying to install postgresql on Ubuntu 9.x as per the steps mentioned in this article but I could not install it successfully.
i am try to dvd player in ubuntu but dvd is not play . i insert a dvd so dvd is not play in ubuntu plz help me wt can i do.
Cool i got all the information i needed.. i got a bit knowledge about linux. gonna install the synaptic head manager kinda lost it..
Synaptic is a great GUI on Debian. Synaptic uses the GTK graphic libraries . Synaptic is a graphical package management program for apt. It provides the same features as the apt-get command line utility with a GUI front-end based on Gtk+.
What a simple and easy tutorial, I’m a newbies for ubuntu, but got everything at hand.
Keep it up.
thanks..thanks a lot………..
I got the similar problem as one of the user above. We installed Astrolog on Ubuntu with Synaptic Manager. But unable to find a shortcut to the program.
I installed VLC with Synaptic but it was sort of hit or miss; I seem to have done it right. Movie Player with add-ons seems to crap out streaming music so I hope VLC works instead.
Wow, these instructions are great. I’m on Ubuntu hardy.
This must have taken a lot of work. Why can’t other people make “linux”/Ubuntu so easy to use? It’s always commandline this, commandline that, and after all is said and done I never felt any more knowledgeable or competent afterwards.
This really made my day.
hi…i m new on ubuntu……n d instructiond n tips r very useful……..
this info is really very helpful…….thanku vei much…..
Recently I helped a friend intall UBUNTU 11.04 which has Synaptic v 0.70. In my version, 0.63, there was a Quick Search dialog box in the Toolbar. Another site shows this DB present in version 0.7. How do I make that DB visible.
Thanks