Dial-up access is a form of Internet access through which the client uses a modem connected to a computer and a telephone line to dial into an Internet service provider’s (ISP) node to establish a modem-to-modem link, which is then routed to the Internet.
Most ISPs provide dial-up connections supporting PPP because it is a fast and efficient protocol for using TCP/IP over serial lines. PPP is designed for two-way networking; TCP/IP provides the transport protocol for data.
PPP (Point to Point Protocol) uses several components on your system. The first is a daemon called pppd, which controls the use of PPP. The second is a driver called the high-level data link control (HDLC), which controls the flow of information between two machines. A third component of PPP is a routine called chat that dials the other end of the connection for you when you want it to.
Configuring a Dial-Up Connection in Ubuntu
Ubuntu includes some useful utilities to get your dial-up connection up and running.Here is the following ways you can connect to your dialup connection
1)Using your networking option in Ubuntu
2)using gnome-ppp
3)using kppp (For Kubuntu)
4)using wvdialconf & wvdial
5)using pppconfig & pon/poff
first thing you need to make sure your modem drivers are installed or not.If you want more details about modem drivers in ubuntu and installation check here
Now we will see 3 ways how to configure dialup connection in ubuntu
Before Starting
Before configuring Dial-up connection you need to have the following information from your ISP
1)Username
2)Password
3)Dail-in number
Configuring a Dial-Up Connection using Networking option
you can go to System—>Administration —>Networking
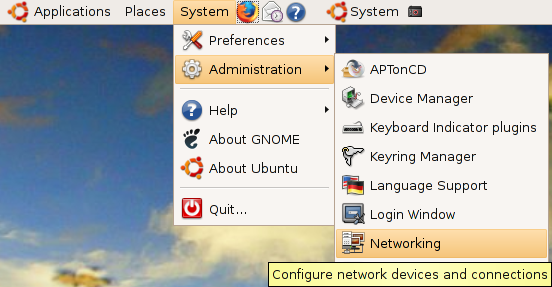
Once it open the application you should see the following screen

In the above screen select modem connection option and click on properties you should see the following screen

The first thing you will need to do is to enable the connection by ticking the Enable this connection box,now you need enter your ISP’s phone number as well as your username and password

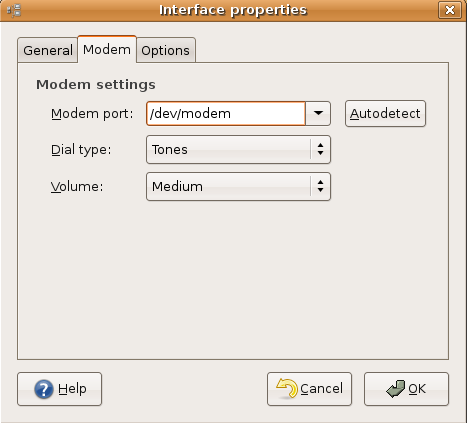
Next, click on the modem tab to specify details about your modem and also configure the speaker volume. Most telephone systems use tone dialling nowadays, so make sure this is selected . I have selected the speaker volume on medium.
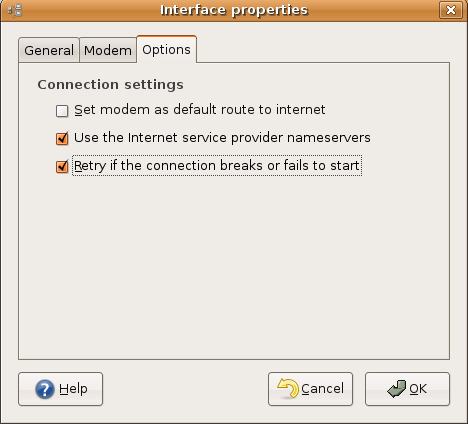
Now you need to click on options tab If you are using a laptop, then you will probably want to uncheck Set modem as default route to the Internet whilst you are on a LAN, otherwise you may struggle to see anything! Tick it when you are expecting to use your dial-up connection though, and Ubuntu will use this connection to get out onto the Internet.You need to select other two options checked.
Now You can use the Gnome Modem Monitor and Network Monitor panel if you want to stop, start and monitor modem connections.
Configuring a Dial-Up Connection using pppconfig
configure a connection using pppconfig, a command line utility to help you to configure specific dial-up connection settings.This is a command line based option to manage dialup connections.
Open a terminal from Applications > System Tools > Terminal and type
sudo pppconfig
Now you should see the following screen here you need to select “Create Create a connection” select ok and press enter

Here you need to enter provider name and you can leave default one and in this example i am giving “comcast” select ok and press enter

Next screen you need to select “Dynamic Use dynamic DNS” select ok and press enter

You need to select Authentication method here i am selecting “chat :Use chat for login/password :Authentication” select ok and press enter

Select login prompt option leave default select ok and press enter

Select password prompt option leave default select ok and press enter

Enter the username given to you by your ISP in this example i am using “ruchiw” select ok and press enter

Enter the password given to you by your ISP in this example i am using “myfirstpassword” select ok and press enter

Enter the modem speed as “115200” select ok and press enter

Select method of dialing as “Tone” select ok and press enter

Enter the number to dial select ok and press enter

Choose your modem configuration method if you want to detect your modem automatically select yes otherwise select no in this example i am selecting no select ok and press enter

Select the modem port and i leave the default option select ok and press enter

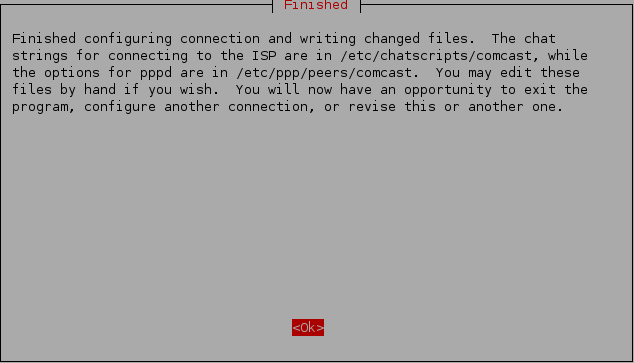
Here is the complete details you have choosen for your provider connection in this example comcast

Finished the connection settings select ok and press enter
Select “Quit Exit this utility”
Exit the terminal window using the following command
exit
Connecting to your ISP
Before you connect for the first time you need to add yourself to both the dip and dialout groups by using the commands
sudo adduser YOURNAMEHERE dip
sudo adduser YOURNAMEHERE dialout
# connect to the ISP configured as “comcast”
pon comcast
# disconnect the ISP configured as “comcast”
poff comcast
If you are trying to connect as default “provider” you need to use the following commands to connect and disconnect
pon
poff
You can check the last messages generated by these commands with
# shows the (status) messages generated by pon and poff
plog
Configuring a Dial-Up Connection using gnome-ppp
GNOME PPP is an easy to use graphical dialup connection configuring and dialing tool with system tray icon support.It uses GNOME/GTK+ for its graphical interface and integrates well in GNOME desktop environment, but it can be used in other environments.
It also uses WvDial dialer as its backend, providing simple configuration via config files. You can also use plain wvdial if you don’t have X running.
Install gnome-ppp Ubuntu
sudo apt-get install gnome-ppp
This will complete the installation.
If you want to open the application go to Application—>Internet—>GNOME PPP

Once application opens you should see the following screen

In the above screen you need to click on setup to configure your settings you should see the following screen configre the modem settings

Next click on networking tab to configure network settings

Next click on options tab to configure general options

Once you have all the details enter the details you can see the following screen

I’m trying to setup Ubuntu for the first time, and get dialup working to my
ISP.
The help info for modem drivers is hidden from me on a “secure webpage”
https://help.ubuntu.com/community/DialupModemHowto/ScanModem
I don’t understand why a help page is “secured”.
I have a partially neutered winblowze without any Java and other web scripting
components so…HTPPS is unreachable.
Thanks, Bill
I have successfully set up a dialup internet connection in Ubuntu 6.06 many times. I have also successfully set up a dialup internet connection in Fedora, each version of Windows, and other programs, many times. However, I have been unable to set up a dialup internet connection in Ubuntu 6.10. What could I be overlooking? Are other people having the same problem?
i am a new user to ubuntu 6.06. i have succesfully set up dailup internet connection using bluetooth modem with gprs in my nokia6600 phone in various version of windows.but idont know how to connect internet usng bletooth modem.please someone asist me how to pair my bluetooth with my phone or kindly recomended me with some links my email id is [email protected]
HI, im also a new user of ubuntu 6.06, I have used many isp’s in my country availabe supporting “all MS windows” everyone tested on windows, but all aboove mentioned methods get fail in ubuntu when i try, i get errors (used Networking, Gnome-ppp, and ppp-config). sometimes I get error 16 in pon , even i have used pap, chat and chap explicitly for many connections in ppp-config. I get connected to by GnomePPP but for 30 seconds and with no “IP” 🙁 . I called My ISP, they told me that there is not a single attempt made by me to connect to them, No nno diled there 🙁 . Can anyone help me finding the potential problem im facing? Any Support will be gratly appriciated!
Usman
[email protected]
I am having the same problem as HAFAAZ.That’s I need to know how to set up the BLUETOOTH connection.my email is….. [email protected].I’ll appreciate any help I can get.
I have the same problem like Guy, I’m using linux since 7 years and beeing not able to reach a working dial-up connection with ubuntu 6.10! Can’t understand why and need help!
I’m a Ubuntu/Linux newbie and am having similar problems to Guy and Tiller. I have finally found a dialup modem that is recognized and can dial out but I appear to have problems at the authentication stage. I have tried the #auth suggestion that apear in various posts with no success. Any help or advice will be greatly appreciated. I’m about to return to the open arms of Bill and the gang in Redmond!
Obviously the network menu format is confusing, been playing with Linux since 1997 and have to agree, kind of a catch 22, need to go to internet to download gnome PPP, but can’t because can’t dialup. Since millions of folks still use dialup, odd it isn’t simpler perhaps there isn’t room on a single CD, but this is indeed a problem.
Good!
Nice tutorial. I was also fed with this problem. thanks for a solution. I will try it now. Let me start.
thanks
I tried the first two, I didn’t have the third program, and I still can’t connect on that computer. Oh, and you can’t exactly download something to a computer that can’t get on the net, so that one is kinda pointless.
Wow,,,,most excellent,,,,WAY better than the Ubuntu forums. Had to sift thru soooooo much stuff in the forums and still not get good instruction.
Many,,many thanks. I’ll definitely utilize this service
Very good detailed help. Thanks a lot.
I also got “Cannot open /dev/modem: No such file or directory” errors initially, when trying to connect using “GNOME PPP”.
But my problem solved as follows:
1. enable “Software modem driver” via System->Administration->Restricted Device Manager (you need an internet connection)
2. once the step 1 is over, replaced “/dev/modem” occurrences by “/dev/ttySL0”
a. System->Administration->Network->Modem Connection->Properties->Modem->Modem port
b. Applications->Internet->GNOME PPP->Setup->Device
Please note that I’m using Ubuntu 7.10 (installed using downloaded ISO image) on hp Compaq nx6120 laptop computer. Also I was not in a position to dial to a real PPP server, but I could get a phone call on my mobile, but I hope it’ll work.
– Amil
Hello,
Pls upload the setting snapshot for dial up connection via blutooth dongle.
I have W700i Sony Ericsson Mobile.
I just installed Ubuntu, and I am trying to get my external modem to connect. I do not get the same screen on the networking pull-down. All I have is wireless and point to point. I don’t have the modem option. Why not??
Hi,
I’ve installed Ubuntu 8.10 (Intrepid Ibex) and I’ve not been able to use my HSF Conexant modem.
I used it ( with the driver supplied by DELL ) with Ubuntu 8.04 (Gutsy Gibbon) but with the 8.10 release it does not go : error due to the new kernel.
Do you have any suggestione?
Thanks in advance for your help!
Best regards
Giorgio
Can someone tell me how to connect a Sprint U720 broadband modem for gnome?
Hi I need help for ubuntu7.1 and reliance datacard ec325.
I had net but suddenly he has cuted. it seems permissions problem in wvdial. exit code=16, a modem hung up the phone. Anyone can help me with wvdial, ppp config, or anything else. My pppconfig doesn’t work too, … disconnected.
sir,
i’m using ubuntu 8.10, pls help me to setup a BSNL Tarang (dial up) connection in it…
regards,
Ershad
I am also having the same problem as ERSHAD said, please if anyone can answer clearly, to me, MY email ID is [email protected]….please help….
i have try the command “sudo apt-get install gnome-ppp”
but after that it gives the o/p me that gnome-ppp coun’t find package
plese help me
I believe Ubuntu is not good for Dial up users and for users without internet connection.
Af, pq o Ubuntu não ajuda a gente e facilita nessa parte da Internet DIscada? pqp… avacalhação.
please help me how to make dail up connection in ubuntu 9.10 with nokia 6630
thanks
victor harris
Ubuntu Network manager is a useless piece of crap.
In fact all of linux presents crap connection software.
And they think the are going to be taken seriously as an OS.
dipshits.
I want to use BSNL Dial up connection in ubuntu 10.10 pls help
plz tell me how shall i configure dial up connection .
i am using samsung mobile.
and aircel network.
hi,i need to know to setup a dial up connection using gnome
Trying to connect dialup get so far using pppconfig done ok.
then I make username member of Dip and dialout ok.
When I use command pon or poff I get message that I this can be used only by members.
What does it mean?
In Ubuntu 11.04 you can install Gnome-ppp from the add software button under applications, but there are several other things to do. Under the admin tab find users and edit both user and group privileges. I gave the user almost all privileges including modem. I gave group DIP access and probably a few others. I also had to give permission for DIP to access the PAP and CHAP secrets in ETC/PPP using gksudo gedit (right click use group drop down and find DIP) give them read and write. Additionally I had to gksudo gedit $HOME/.wvdial.conf to change check carrier to off and stupid mode to on. Then I opened gnome-ppp hit the set-up button and detect. Closed that screen and entered username, password and number, but then I had to gksudo Gnome-ppp to connect one time. — These directions are not the best but they will save you days of internet searching for solutions and give you hints at where to look. Good luck. Perhaps someone can do an install and rewrite with the actual step by step instructions. I’m exhausted after 3 days of a steep learning curve and no complete set of instructions anywhere (each step got me closer, but the final step that got me online came from a website in New Zealand. Way to go down under!).
Hi Chinmay, go to system-preferences-network connections. click on mobile broadband.click add and setup a connection. no need to give user name and password.